A Windows PC builds the game from your dump with the "for Windows PCs" download (Pokopia-Native-for-Windows.zip), in one app, Pokopia Native:
- the Windows game: Pokopia recompiled for your PC, played in a window (or full screen) with a Vulkan renderer. The next section.
- the iPhone app (the IPA): further down. The Mac app needs a Mac.
- the Android app (beta): the same download makes it, in the app's Build section (the Android guide).
The Windows game: play on this PC
Status (1.6.2): works for 1.0.5 and 2.0.1. It was developed and tested on one PC with an NVIDIA card; players run it on NVIDIA, AMD and Intel graphics, and some AMD and Intel cards still have problems (see Known issues). Tell me in the issues how it runs on yours, with the log (it names no files of yours beyond the paths of your build folder, and only the first group of your room code).
The game's arm64 code is recompiled for x86-64 on your PC (our own recompiler, nxlift, built on LLVM), and runs on our
own runtime (nxrt: the Switch services ported from nxnative, NVN replayed on Vulkan, SDL3 for the window, input and
sound). Nothing of the game is in the download: the recompiled game, its shaders and everything else made from your dump
stay in your build folder.
What you need
- Windows 10 or 11, 64-bit, with a CPU that has AVX2 and FMA3 (Intel Haswell from 2013 or AMD Excavator from 2015, and anything newer), and 16 GB of memory to be comfortable (the game itself took about 5 GB on the test PC).
- A graphics card with Vulkan 1.3 and a current driver (NVIDIA, AMD or Intel).
- About 12 GB free where the build folder goes, per game version.
- Your dump: the game's files as your dumping tool wrote them, with the update (game version 2.0.1 or 1.0.5; the
base game alone is not enough), or a
.nupfile. The app tells you which version you have.
Nothing to install first. The download carries everything it uses: the app (pokopia-native.exe), its own Python with the
packages it needs (runtime\python), the .NET runtime for the shader translator (runtime\dotnet), nxnative already set up
(nxnative), and the game's tools (windows\bin). No compiler, no SDK, no installer and no administrator rights.
runtime\MANIFEST.txt and windows\bin\MANIFEST.txt list where each piece comes from, with their licences beside them. A build copies
the Python and .NET it needs into its own folder, so the game keeps working if you delete the download later. The app checks your PC
before the first build and says what is missing.
Pokopia Native Builder.cmd is still in the download: it is the builder window of 1.4 and before. Everything on this page is in the app, so you don't need it; it is there for anything the app doesn't do yet (the Android phone's report, for one), and it builds the same game into the same build folder.
Build
Unzip the download into a folder of its own (outside Documents, Desktop and Downloads is best, for example C:\Games\Pokopia Native)
and double-click pokopia-native.exe: that's Pokopia Native. The first time, it walks you through the first run:
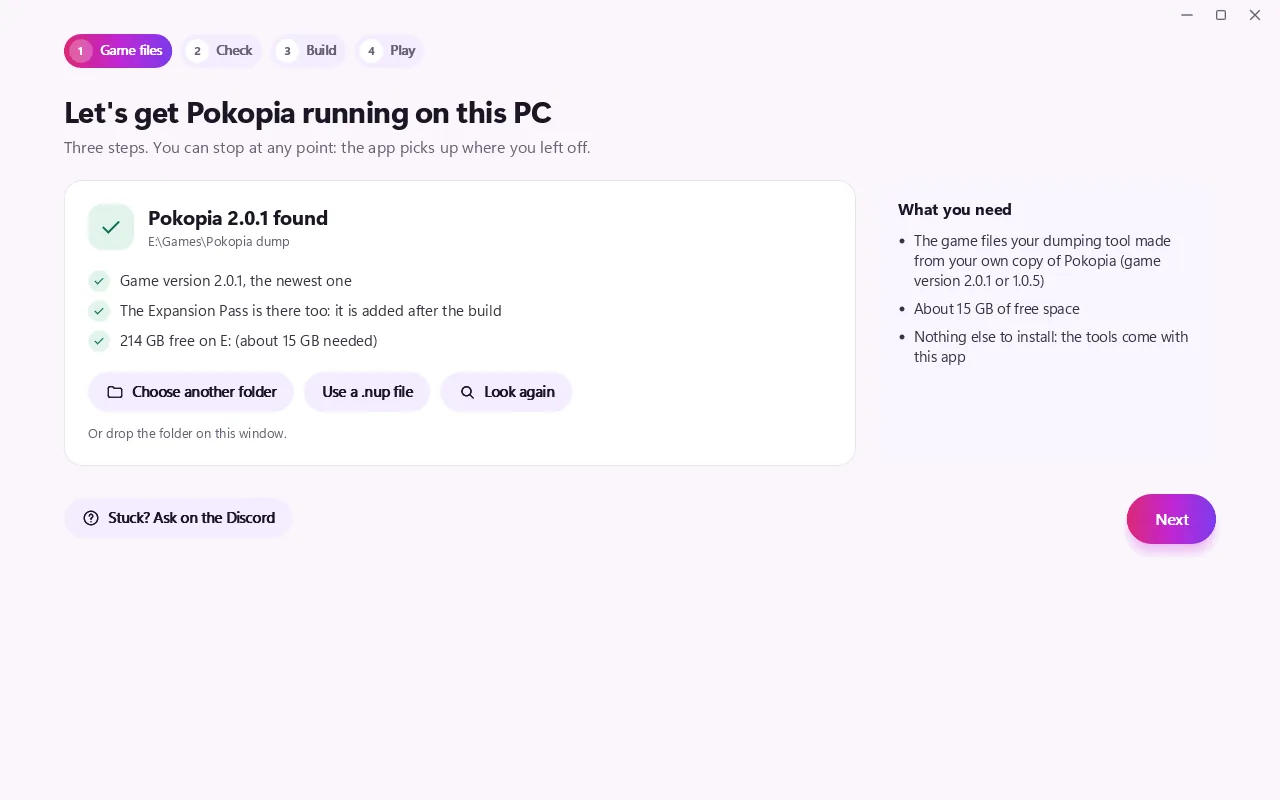
- Game files. The app looks for your game files in Downloads, the desktop and your other drives, and says what it found: "Pokopia 2.0.1 found", whether the Expansion Pass is beside it, and the free space there. If it found none, or the wrong ones, press Choose another folder (or Use a .nup file), or drop the folder on the window. Then Next.
- Check. It checks Windows, the processor (AVX2), the graphics driver (Vulkan), the build tools and the space, and times a short test to tell you how long the build takes: Gentle (recommended) keeps your PC cool and usable, Full speed uses every core and the fans get loud. Then Start building.
- Build. The Building screen shows the time left and each step: copying your game files, preparing the game's code, preparing the graphics, recompiling the game for this PC, packing it up. The rest of the app works meanwhile. Pause stops it, and closing the app pauses it too: it carries on from there next time. Tell me when it's done flashes the taskbar button when it is.
- Play. "Your game is ready": Play, and beside it Add to Steam, Bring my save and Add my DLC (the sections below).
If Windows shows "Windows protected your PC" the first time, it's because the download came from the internet: choose More info then Run anyway.
Later, the app's Build section has the rest: Build again redoes only what changed or is missing (a repair takes minutes), Check this PC runs the check again, Build 1.0.5 (or 2.0.1) builds the other game version when its game files are found, Speed chooses Gentle or Full speed, Last build has Copy the error and Show the logs, and Game folder opens the build folder, or Change picks another one a build made (another game version, an older build): Play, the save and the mods follow it. Other devices has the iPhone and Android apps. Saves and DLC → Profiles keeps a save for each person, in a folder you can share between devices (Saves).
From a terminal in the download's folder, the same build is:
runtime\python\python.exe nxs2.py build "C:\path\to\your dump folder" --windows
In the terminal commands in this guide, python is the download's own runtime\python\python.exe (a Python 3.12 to 3.14 of your own
works too).
The steps, with the times measured on my PC (an i9, 4 workers; the default on a PC with 8 threads is 2, about twice as long):
| Step in the app | What happens | Time |
|---|---|---|
| Copying your game files | the ExeFS copied, the RomFS packed into one image (about 7 GB) | under a minute |
| Preparing the game's code | the game's shaders found, lowered (ampere-lower) and packaged; nxanalyze: the game's functions, control flow and bindings (program.db) |
2 minutes |
| Preparing the graphics | nxshader: about 3,900 shaders translated to Vulkan SPIR-V and checked with spirv-val |
6 minutes |
| Recompiling the game for this PC | nxlift: about 200,000 functions through LLVM into game.dll (390 MB), at idle priority |
11 minutes |
| Packing it up | nxrt.exe and the launchers beside the game |
seconds |
The recompile is the long part; it runs at idle priority with at most four workers, so the PC stays usable. If the build stops, Try again carries on where it was. When a new pokopia-native comes out, see Updating.
Play
Press Play on the app's Home (or the Menu button on a controller). The app steps aside while the game runs; F1 in the game opens the same settings as the app's Settings. Change, beside Play, chooses how you play: alone or Link Play (below).
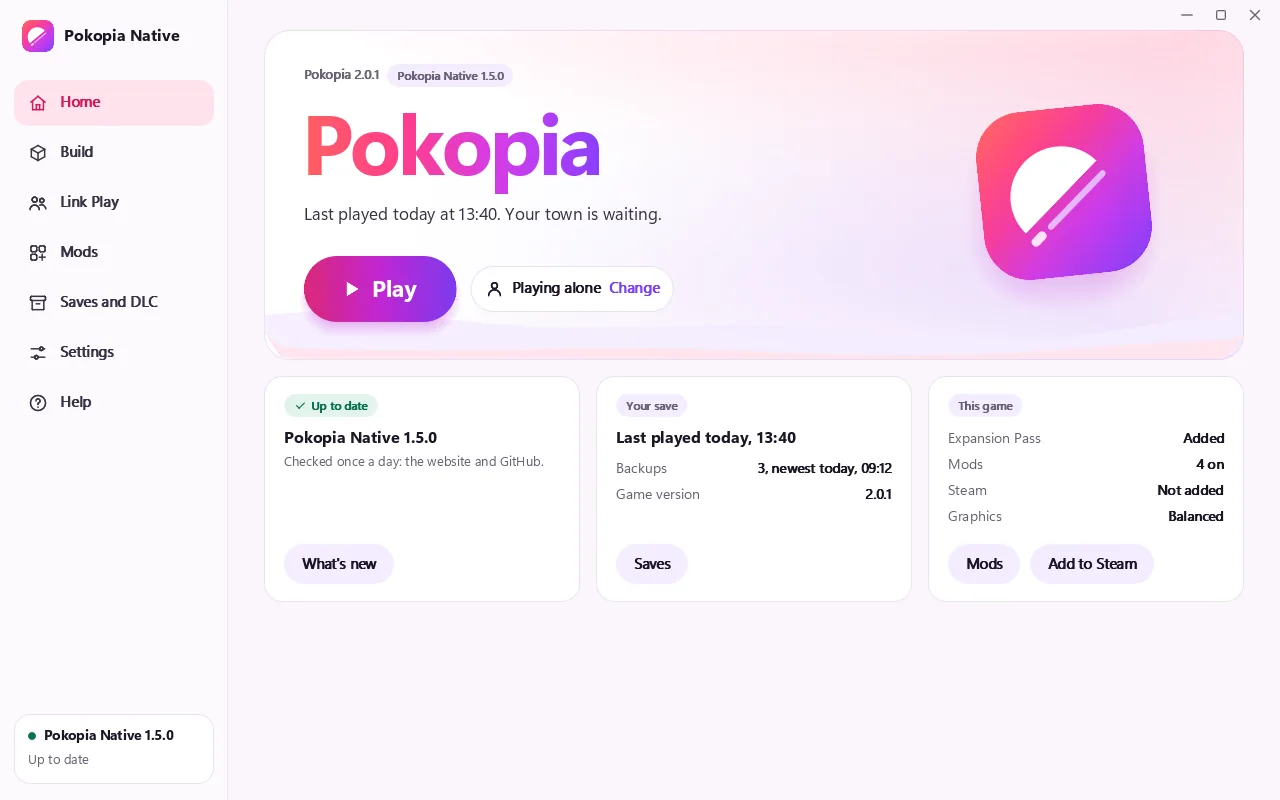
Add to Steam (on Home, or Settings → App → Steam) adds Pokopia to your Steam library as a shortcut to the app; it keeps working after updates. Steam must be closed while it adds. Settings → App → Starting from Steam or the desktop can start the game right away instead of the app (hold Shift while starting to see the app again).
The game's own launchers are still in <build folder>\out: Play Pokopia <version>.exe starts the game without the app (with
its older settings window first), and Pokopia Settings <version>.exe opens that window. The .cmd files beside them do the same
in a console window and take the terminal switches (-Fullscreen, -Window 1600x900, -Silent, -PadCheck); if the game ever says it
didn't start, the .cmd shows the same and more. From a terminal: python nxs2.py run "<build folder>".
The app's Settings has four tabs: Graphics (the picture), Display (window or full screen, console mode, vsync, the FPS counter), Controls (your controller's buttons, player 1, the keyboard's keys) and App (updates, Steam, versions). They are the same settings as F1 in the game.
- Keyboard and mouse: WASD moves; click the picture and the mouse looks around (Esc gives it back); J K U I are A B X Y, Q E are L R, Z C are ZL ZR, Return is +, Tab is −; F11 is full screen; F1 opens the settings.
- Your own keys: in the game, F1 → Controls → Keyboard: choose an action, then press the key you want for it (a key
another action had swaps over); Reset to defaults brings the layout above back. Keys count by their place on the keyboard, so the
map works the same under any keyboard language. It is saved for this PC in
%APPDATA%\Pokopia Native\controls.json, and the game's log lists the keys it uses. Esc, F11, Alt and the Windows keys can't be used. The Mac and the iPhone change theirs in their own settings window (Mac, iPhone). - Controllers: Xbox, PlayStation and Switch Pro controllers work as Switch controllers (face buttons by position),
with rumble and motion. So does the Steam Controller, and many less common controllers through SDL's community list
(
gamecontrollerdb.txtbeside the game); one the list doesn't know gets a guessed layout instead of being ignored, and you can fix its buttons (next point). Close Steam or turn off Steam Input for the controller if it does not show up. - Your own controller buttons: one map for every controller. In the game, F1 → Controls → Controller: choose a
Switch button, then press the controller button (or pull the trigger) for it; a button another one had swaps over, and
Home can't be changed. The app's Settings → Controls has the same map as a list, and All buttons → Reset brings the
usual layout back. It's saved in the same
controls.json. - Player 1: with more than one controller, F1 → Controls → Controller → Player 1 picks which one is player 1 (step through them, or press Enter and then any button on the one you want). It's remembered: that controller takes player 1 whenever it connects. The app's Settings → Controls shows it too.
- Typing (your name, for one): a small box opens over the game. Type and press Enter, or with only a controller press A, B or + to accept it (an empty box becomes "Player"; the game won't let you change your name later, so a keyboard is best for this one).
- The picture: Resolution is the size the game draws itself at: Default: your monitor (where it starts), 1920x1080 (the game's own size), 2560x1440 or 3840x2160. Bigger is sharper and asks more of the graphics card; on a card with 4 GB of its own memory or less, Default stops at 2560x1440. The same settings hold the console mode (Docked (TV) or Handheld), window or full screen and the window size, Upscaling (Sharp or Standard) with its Sharpness (they only matter when the window is larger than the picture), 60 or 30 fps, vsync and an FPS counter.
- Wide view (experimental), for 21:9 and wider screens: the game's world fills the whole width instead of black bars at the sides, and the HUD, menus and text stay in the middle 16:9 part. It is off by default, applies from the next start and changes nothing on a 16:9 screen. For a sharp picture, pick a Resolution at least as wide as your screen (for a 3440x1440 monitor, 3840x2160, if your graphics card can handle it). Its limits are under Known issues.
- Settings while you play: press F1 (or Minus + Plus together on a controller) for a settings menu over the
game, with a Graphics tab (everything above), a Controls tab (your keys, your controller's buttons and player 1)
and a Link Play tab (below). Changes apply at once; Console mode and Wide view
apply from the next start. F1 again, Esc or Close closes the menu. The app's Settings has the same settings; both are saved
for this PC in
%APPDATA%\Pokopia Native\display.jsonandcontrols.json. - Switches for
Play Pokopia <version>.exe(or its.cmd) go after its name in a terminal:-Fullscreen,-Window 1600x900,-Silent,-PadCheck(the controller check: every button and stick is logged and shown in the title bar). A switch given there wins over the settings.
The first start takes a moment longer: the game makes some of its shaders while it runs (about 150 of them, 20 on the
title screen alone). The Windows game records each one the first time the game asks for it and translates it on the
spot, so a few things appear a little late on the first title screen and in the first minutes of play; after that they
are there from the start. Nothing to do for you, and nothing is skipped for long. (The same recordings also finish the
iPhone app of this build folder: nxs2.py refresh takes them. How it works explains these shaders,
and the iPhone guide the refresh.) The graphics pipelines
of the title, a new game and the first towns (2.0.1 and 1.0.5) are built on background threads while the game starts, from a list
the download ships (profile/0400A3A01EE4C000/pipelines.<version>.tsv), so those areas play without first-time freezes;
places further on build theirs the first time you visit, once. To have them all made before you play (a progress screen at
the start; any button goes on): F1, Graphics, "Shaders: Prepare before playing". A problem report includes the list your
game made (shader keys and settings only), which grows the shipped list.
Your save
The Windows game plays the save in %APPDATA%\Pokopia Native\<version>\save (the game's own B00, G00 and S00
folders), started empty the first time. The app's Saves and DLC shows it:
- Bring a save from another device: choose a folder holding
B00,G00andS00(the iPhone'sDocuments\saveastools\phone_pull.pybrings it, the Mac's~/Library/Application Support/nxnative/0400A3A01EE4C000/save, a Linux PC's or a phone's). Bring my save on the "Your game is ready" screen does the same. From a terminal:python nxs2.py import-save "<build folder>" "<that folder>". - Back up now makes a copy of your save, and Backups lists them: one is made before every update too. Restore puts one back (the save you have then is kept beside it first). Open opens the save folder.
The save that was there is kept beside it as save.before-<date>, never deleted. A save the 2.0.1 game has written may
not load in 1.0.5: keep each version's save apart (they are, by default). Saves go back the other way by copying the
folder: Windows saves load on the Mac and the iPhone. Saves has more on backing up and moving saves.
Updating
The app tells you when a new version is out: the box at the bottom of its sidebar says "1.6.2 is ready", and Home has Update now. It asks the website and GitHub once a day for the latest version, and sends nothing about you, your game or your PC. Settings → App → Check for updates turns it off.
While the app is open, the website counts it in players online now: the app sends a random number made new at each start, whether you're playing, the kind of computer and its version, and nothing else (LEGAL.md). Settings → App → Players online on the website turns it off.
Update now does everything: it downloads the new version beside this one and checks it against its checksum, makes a backup of your save ("Before the update"), opens the new version, and that one updates your game. Only what changed is redone: seconds when only the runtime changed, longer when the recompiler or the shader translator did. Your settings, your save, your mods, the Expansion Pass and the graphics prepared so far stay.
Going back: the version before stays on your PC. Settings → App → Versions → Update or roll back shows both, and Roll back ("Go back to 1.5.0?") brings the earlier one back as it was, in seconds; your save and settings stay, and you can switch again.
By hand, or coming from 1.4.1 and before (which had the builder window, not the app): download the new
Pokopia-Native-for-Windows.zip,
unzip it into a new folder and open pokopia-native.exe in it. It finds your build folder by itself, and when the game there was
built by an older version, Home says "Update your game for 1.6.2: your save and settings stay; this first update from 1.4.1 redoes
the long steps once." with one button, Update my game. Play waits until it's done.
Link Play needs a matching pokopia-native version on every device, so update them all. The iPhone app needs a refresh and a new signature after an update (below).
Your DLC
If you bought the game's DLC, the Windows game can use it too, from your own dump of it, made the same way as your dump of the game:
- In the app's Saves and DLC → Expansion Pass, press Add my DLC (or Add my DLC on the "Your game is ready" screen) and
choose the folder your dumping tool made from your DLC: its RomFS, or the folder holding it. When the first run found it beside your
game files, it's added after the build by itself. Remove takes it out again. From a terminal:
python nxs2.py import-dlc "<build folder>" "<your DLC folder>". - It's copied into your build folder's
dlcfolder, and the game finds it from its next start. Your folder is only read.python nxs2.py import-dlc "<build folder>" --removetakes it out again. - Only your own DLC. Pokopia Native never downloads, makes or unlocks DLC: without your dump of it, the game has none. Never share your DLC folder, or a build folder that holds one.
- The iPhone app made on this PC packs the DLC in too, and
phone_setup.py --dlcputs it on a phone that already has the app: Playing on your iPhone.
Link Play (co-op) between our builds
Link Play → Local connection in the game works with the Mac and iPhone apps and other Windows PCs (Playing together has the whole picture). Every device needs a matching pokopia-native version (Playing together says which versions play together) and the same game version (1.0.5 or 2.0.1), and each player needs their own save (the game refuses a second copy of the host's save, so a save copied from one device to another cannot join itself).
The app's Link Play (or Change beside Play on Home) sets how you play from the next start:
- Play alone: just you;
- Same network (the same Wi-Fi): host or visit from the game's Link Play;
- Host over the internet: friends visit your town. Without a VPN, port 47600, TCP and UDP, has to reach this PC. The game asks your router to forward it while you host (UPnP, NAT-PMP or PCP) and closes it again when you stop; if your router doesn't, forward the port by hand. The app shows your room code with Copy the code (and New code for a new one); give it to the visitors with this PC's internet address (through a VPN such as Radmin VPN, Hamachi or Tailscale: its address in the VPN). The game's window shows your address when you host;
- Visit over the internet: type the host's address and room code; they're remembered;
- Split screen (experimental): two players on this PC, each with a controller and a save of their own (Playing together). Choose Top and bottom, Side by side, or Two monitors: with two monitors each player gets a whole one, full screen (player 1 the main monitor, player 2 the next one).
Under them, Interact everywhere (experimental) lets Link Play players use moves and items and build in every town, not only
Palette Town (Playing together explains it). Every player needs it on, the iPhone and Mac in their launcher.
Story co-op (experimental) goes one step further: visitors can also talk to the town's story characters (it needs Interact
everywhere on). Story requests still count only for the host; Playing together says what does and doesn't
count. Every player needs it on too. Both work on game versions 2.0.1 and 1.0.5 (until 1.3.2 on 2.0.1 only; on 1.0.5 every device
needs 1.3.3 or newer). The choice lives in %APPDATA%\Pokopia Native\linkplay.json.
In the game, F1 → Link Play shows how you're playing, the addresses to give your friends, the room code with Copy and Copy invite (your address and code in one line, ready to paste in a chat), whether the port forwarding worked (and what to do if it didn't), and who is connected. Change how you play there switches the way to play, the host's address and the room code without going back to the app: press Apply. These apply at once while the game's Link Play is closed (leave Local connection first). Turning Link Play on or off, Interact everywhere and Story co-op apply from the next start. The app remembers the new choice.
Play Pokopia <version>.exe, started on its own, still asks in its own window (its Link Play tab), and remembers the choice the same
way. From a terminal, switches after its name skip that window: -LinkPlay; -Join <address>[:<port>] visits one
host by its home-network address (a VPN's address, such as Radmin VPN's 26.x, needs -Internet and -Room too); -Internet with -Room <code> (a host without one gets a new code); -Relay <address>[:<port>] goes
through a relay you trust; -Interact turns on Interact everywhere; -Story turns on Story co-op (and Interact everywhere).
- The first time, Windows Firewall asks whether the game may use networks: allow Private networks. Your network must be Private (Settings → Network & internet → your connection → Network profile type: Private): on a Public network Windows keeps the other devices out, and the game's log says so.
- Host and visitors choose the same way: "on this network" with the iPhone's and Mac's Internet play off, "over the internet" with it on. A device with Internet play on does not see a host on the same Wi-Fi without it.
- Several network adapters (Wi-Fi and Ethernet, an iPhone plugged in by USB, a virtual machine's adapter) are fine: the game tells the others all its home-network addresses, and they pick the one they can reach.
- The log (the folder the console window names) has a
[coop]line for everything Link Play does: who connected, a wrong room code, a different pokopia-native version on the other side.
Problems
Troubleshooting has the common problems and what to do about them.
- When a build step stops, the Building screen says what went wrong. Try again carries on from there, Copy the error puts it
on the clipboard for a report, and Ask on the Discord opens the Discord. Build → Last build has Copy the error and
Show the logs too. Each step's full output is in
<build folder>\logs. - The game's log is in
%LOCALAPPDATA%\Pokopia Native\<version>\logs(the.cmdlauncher's console window names the folder). The first lines name the GPU, the driver and the game version. - The app's Help has the common problems, All guides and Ask on the Discord.
nxs2.py status "<build folder>"lists what the build folder has.- A black or flickering window right after the start, with the music playing: the first-start shaders above; give it a minute.
- A controller that does the wrong thing: start the game with
-PadCheck(above) and attach the log.
Recording a problem in the game. For a slow or stuttering game, or something that looks wrong on screen, record it while it happens: press F1 (Minus + Plus on a controller) → Report.
- Record 60 seconds closes the menu and measures the next minute, frame by frame: keep playing where it's slow. A message says when it's saved.
- Capture what's on screen saves a picture of the game (without the menu) and the list of the graphics programs that drew it: press it while the problem shows.
The report below takes your newest recording and capture by itself. The game also keeps the last five minutes when you close its window, and the log notes every moment the sound drops out.
Making a report. In the app: Help → Report a problem. Pick what happened (Crash, Freeze, Frame rate, Graphics, Sound,
Controls, Link Play, Build or update, Something else), say what you were doing if you like, choose what goes in (the logs and
recordings of your last game and build, this computer's graphics card, processor and memory, your settings and the mods in the folder:
each can be left out), and press Make the report. It makes one zip on your desktop, with nothing sent anywhere and never your save,
your game files or your name; its summary.txt puts the main numbers in plain words: Show the file, Copy a summary for your
post, Open the Discord. Post it in the Discord's help channel,
or attach it to an issue on GitHub. Without the app, attach the newest log from %LOCALAPPDATA%\Pokopia Native\<game version>\logs\
and say which Windows version, graphics card and game version (2.0.1 or 1.0.5) you have: for a freeze the log names the graphics program
the card was running when it stopped. Screenshots help too. Never attach the build folder, game.dll, shader files or saves.
Known issues
- The graphics update was tested on one PC (Windows 11, an NVIDIA RTX 4070 Ti with 12 GB, a 4K monitor). AMD and Intel graphics, RTX 50 cards and 4 GB cards are untested with it; please report how it runs.
- AMD and Intel graphics: since 1.5.0 the game runs its graphics programs in groups of 32 wherever the card's driver allows it
(the 32-lane test mode of earlier versions); the log says "made with 32 lanes". If something looks worse than in 1.4.1, open
PowerShell, run
setx NXRT_VK_SUBGROUP32 0, close the app if it's open, start the game, and tell us.setx NXRT_VK_SUBGROUP32 ""goes back to the default; do that too if you turned the test mode off before. - AMD: a dotted line of purple squares in the sky, for example in the opening scene where Tangrowth says "This way!". It doesn't affect the game otherwise. And when the game catches a driver crash, that one effect is left out of the picture instead of the game closing: tell us if you see something missing.
- At 30 fps the picture reaches the screen about a frame later than at 60.
- Wide view: full-screen menus such as the camera menu and the album show black bars at the sides, and speech bubbles and markers near the sides of the screen drift toward the middle and can be cut off. Photos come out at the usual 16:9. The story's movies and 32:9 screens aren't checked yet.
- Controllers were tested with SDL's virtual pads and by hand on one PC; rebinding and player 1 only with virtual pads so far. Two controllers of the same model look identical to the game, so the remembered player 1 is whichever of them connects first. Valve's newest controller isn't known to the game's controller library yet; under Steam it still works as an Xbox controller.
- Automatic port forwarding was tested against simulated routers only. Your router needs UPnP (or NAT-PMP / PCP) turned on, and Windows Firewall still asks the first time you host. When your internet provider shares one address among many homes, no router setting helps: F1 → Link Play says so and suggests a VPN.
- F1 → Link Play lists every network adapter's address, including virtual ones (WSL, Hyper-V, VirtualBox, VMware). The first one is the one your PC uses for the internet: give your friends that one, or your VPN address for VPN play.
- Interact everywhere and Story co-op are experimental. The game's own messages still mention Spectator Mode. On 1.0.5 they haven't been played in a session with two players yet. With Story co-op, a Pokémon with a "Time to get chatty!" request can ask the host to "bring" themselves over: end the session and talk to it again alone.
- Rebinding, the in-game Link Play tab and automatic port forwarding are Windows only for now. The Mac and the iPhone keep their own controls.
- There is no matchmaking server for Link Play over the internet.
The iPhone app, built on Windows
The iPhone app
A Windows PC builds and signs the iPhone app, the same app a Mac builds. It cannot build the Mac app. The build uses the tools nxnative's Windows port maps Apple's tools onto: the shaders go through Apple's own Metal compiler for Windows, the app is compiled with LLVM against the iPhone SDK.
Status (2026-11-03): works, for 1.0.5 and 2.0.1. Built and signed on a PC, the app plays on my iPhone like the Mac-built one. One thing is
different from a Mac: a PC building only the iPhone app cannot record the shaders the game makes while it runs
(How it works explains them). Until your phone has recorded them once, the title screen is black apart from its text; the
steps for that are at the end of this page. (If you also play the Windows game from the same build folder, its
recordings do the same job: nxs2.py refresh picks them up.)
What to install (once)
In the app: Build → iPhone → Set up the iPhone app. Its six steps are the sections below; step 1, Check (or
python nxs2.py doctor), lists these tools and says what is missing. Python with its packages (capstone, lz4, fonttools, pillow) and the
.NET runtime come in the download; the iPhone app needs these on top:
| Tool | Where | Why |
|---|---|---|
| LLVM for Windows | github.com/llvm/llvm-project/releases, LLVM-<version>-win64.exe |
compiles and links the iPhone app (clang, ld64.lld) |
| Metal Developer Tools for Windows | developer.apple.com/download (Apple ID) | Apple's Metal compiler: the shaders and the host's own Metal code |
| Vulkan SDK | vulkan.lunarg.com | its spirv-cross.exe turns the translated shaders into Metal source |
| git | git-scm.com | fetches nxnative and its Windows port at the pinned commits |
Xcode (Xcode_27.x.xip) |
developer.apple.com/download (Apple ID; about 8 GB, downloaded once) | the iPhoneOS SDK the app is built against, extracted below |
The iPhoneOS SDK is taken out of the Xcode archive: Xcode's archive... in step 1, then choose the .xip. From a terminal (after
python nxs2.py setup, which fetches the extractor):
python nxnative\win\sdk\extract_xip.py "C:\path\to\Xcode_27.1.xip"
A few minutes; the SDK lands in nxnative\win\sdk\out\, where the build finds it (NXW_IOS_SDK=<folder> names another).
Apple's licence terms for Xcode and its SDK are between you and Apple; the Windows port's README says to read them before using the SDK off a Mac. The Windows build was made and tested here with LLVM 23, Metal Developer Tools 6.2 and the iPhoneOS 27 SDK.
Build the IPA
In the app, step 3, Build the iPhone app → Build it: it builds on this PC on the same Building screen, from the game files of your Windows game (the first time it fetches the iPhone toolchain first). From a terminal:
python nxs2.py setup
python nxs2.py build "C:\path\to\your dump folder" --ipa
The stages are the Mac's minus the Mac host: the game image, the rewritten code, the shader corpus, the lowering, the package, the Metal compile (iOS libraries only), the app. The Metal compile is the long part here too.
Load. By default the build runs a quarter of your CPU threads (at most 8) at low priority, so the PC stays cool and
usable while it works; expect an hour or so. Full speed (on the Building screen, or --full-speed, or -j N) uses every
thread and is much faster. Only use it on a machine you trust with a long all-core load: my own PC, an i9-13900KF on an old
BIOS, blue-screened a minute into a full-speed shader compile. 13th and 14th generation Intel Core CPUs need the BIOS
update with Intel's 2024 microcode fix (0x12B or newer) for that; the check (python nxs2.py doctor) warns when yours does not have it.
The output is <build folder>\out\PokemonPokopia-unsigned.ipa: the app without the game files, its executable carrying
the two kernel entitlements in an ad-hoc signature, plus romfs.id, the identity of your game image.
The app's home-screen icon is Pokopia Native's own. For one made from your game, take a screenshot of the game's title screen on your
Switch 2 (Capture button), copy it to the PC and run python nxs2.py icon "<build folder>" title.jpg before the build (or build again
afterwards).
Sign and install
The IPA has to be signed with a paid Apple Developer Program team (see the iPhone guide: the game's memory needs the Extended Virtual Addressing entitlement, which only that signing carries). On Windows the build tool signs it itself, with rcodesign (fetched by Setup and checked against its published checksum). It needs two files from your developer account:
- Your Apple Development certificate with its private key, as a
.p12. If you have a Mac with Xcode, export it from Keychain Access (My Certificates, right-click "Apple Development: ...", Export). Without a Mac: make a certificate signing request withtools-bin\rcodesign.exe generate-certificate-signing-request, upload it at developer.apple.com → Certificates (+, Apple Development), download the certificate and combine it with the key into a.p12. - A development provisioning profile (
.mobileprovision) for the bundle IDorg.nxnative.0400a3a01ee4c000, with your iPhone on it. At developer.apple.com: Identifiers (+, App IDs, that bundle ID, and tick Increased Memory Limit and Extended Virtual Addressing under Capabilities), Devices (your iPhone's UDID), Profiles (+, iOS App Development, that App ID, your certificate, your iPhone). If Xcode already signed this app for you, that profile works too.
In the app, step 2, Your Apple files: Certificate... and Profile... choose them. Then step 4, Sign it: type the certificate's password (it's only used for this signing) and press Sign. Or from a terminal:
python nxs2.py sign "<build folder>" --p12 my-cert.p12 --profile Pokopia.mobileprovision
The result is <build folder>\out\PokemonPokopia-signed.ipa. The tool checks that the profile matches the app and
grants both memory capabilities, and after signing it reads the signature back and stops if an entitlement is missing.
Then step 5, Put it on your iPhone → Install: plug it in, unlock it and trust this PC (Developer Mode on). Installing over an
older app keeps its save: never delete the app first. Or, as on the Mac (IPHONE.md): pymobiledevice3 apps install <ipa>,
and tools\phone_setup.py --romfs <build folder>\extract\RomFS.img for the game files.
The first run (once). Start the game on the phone and let it reach the title screen: it is black apart from the version number and "Settings", the music plays. Press A and play into the game for a few minutes (the opening, the first area), then close it. The phone has now recorded the shaders the game made. Bring them over and build them in:
python tools\phone_pull.py "<build folder>\phone\first-run"
python nxs2.py refresh "<build folder>"
(refresh finds what is under <build folder>\phone\ by itself. After the pull, step 6 in the app, After the first play:
refresh the graphics → Refresh, does the same as the second command.)
Sign the new IPA again and install it over the old one (your save stays). From then on the title screen and everything you played through are drawn. Anything new the game makes later is recorded the same way; refresh again whenever you like.
After an update to a new version, refresh again (the second command above, or Refresh), then sign the new IPA and install it over the old app (never delete the app first: that deletes its save).